
Point of Sale & Restaurant Keyboard Shortcut
| Technical name | pos_restaurant_ext_keyboard_app |
| License | OPL-1 |
Point of Sale & Restaurant Keyboard Shortcut
POS Keyboard is an amazing app to improve the productivity of the cashier in shop as well as restaurant who are using POS. The app helps user to perform all the standard operations effectively, just by using keyboards.

Cashier can use keyboard for operations.
Cashier can use the keyboard for standard operations like adding discounts, searching, customer adding and many more.

Use single buttons from keyboard to do operations.
Cashier can use single keys from the keyboard to do various operations, which helps to increase productivity.

Helpful for POS restaurant cashiers
POS restaurant cashiers can also use it to for adding discounts, searching, customer adding and many more.
Description
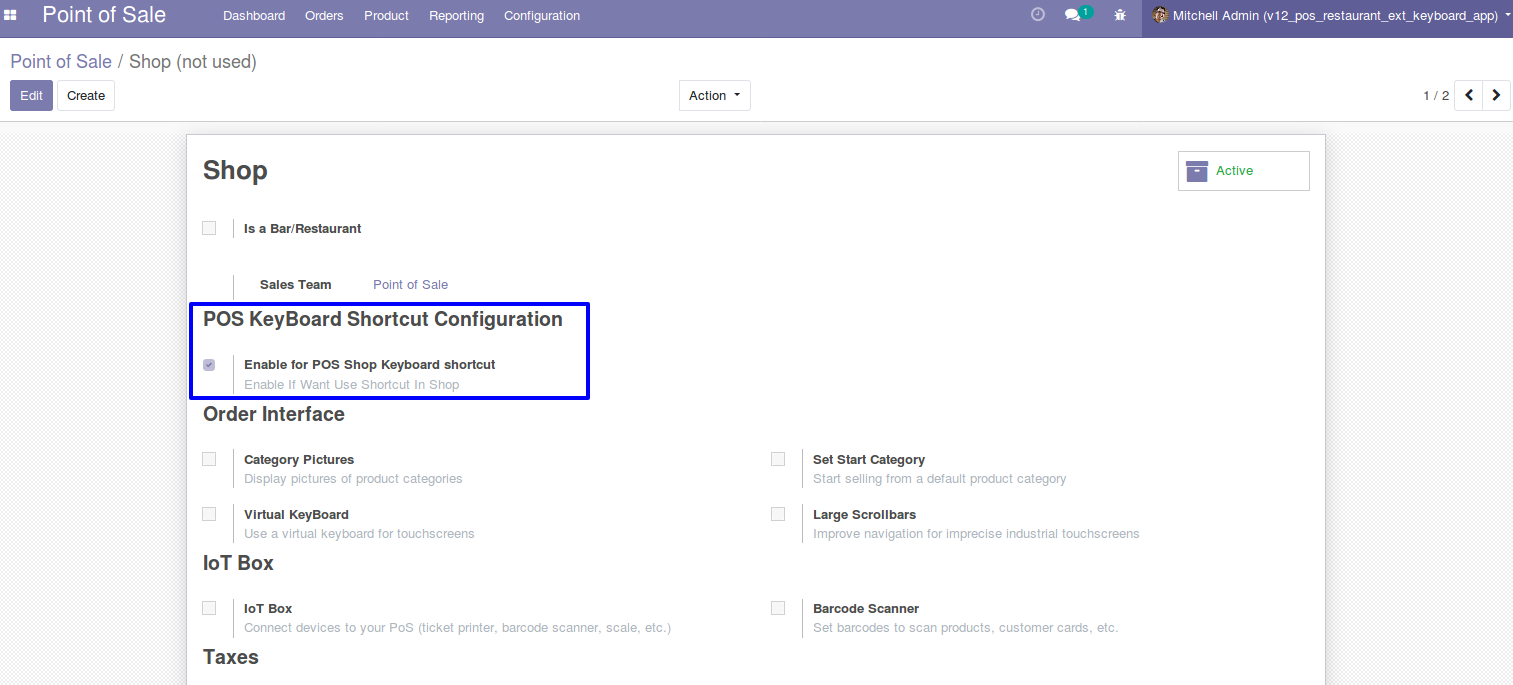
Configuration for Shop keyboard
Users can allow shop cashier to use keyboard.
Product Screen
Inside Product Screen, this app can help cashiers to search product through search mode and come back to regular mode.
| Action | Key | Description |
| Find | f | Inside Product screen we can find or search product by clicking on "f" button. |
| Regular | Esc | Product screen opens by default in regular mode but if you want to get back to regular pos mode from search mode use the "Esc" button. |
| Selection of product line Change | Up-arrow and down-arrow | Users can change the selection of order line by clicking on to up-arrow and down-arrow. |
Search Mode
Inside Search mode, user can search products and add to the pos order line.
| Action | Key | Description |
| Back to Regular | Esc | Product screen opens by default in normal mode but if you want to get back to regular mode from search mode use the "Esc" button. |
Regular Mode
Default product screen where, cashier can insert, delete, confirm and many other things in regular mode through keyboard.
| Action | Key | Description |
| Cancel | Esc | To cancel the order by clicking on "Esc". |
| Destroy Order | Delete | User can delete the order by clicking on "Delete". |
| Insert Order | Insert | User can Insert the order by clicking on "Insert". |
| See all Customer | c | User can check all the customers by clicking on "c". |
| Make Payment | Enter | User can make payment of order by clicking on "Enter". |
Number Pad
Numbers can be really helpful for the cashier to add quantity and discount to the pos screen. It works on the basis of selection, for example if user have selected a product and quantity from action pad he/she can make changes in the selected operation by clicking on numbers in keyboard.
| Action | Key | Description |
| Numbers | 1-9 | Users can add discounts, product quantity and price as per their selection. |
Action Pad
User can do various operations in action pad like add quantity, add discount, and add price through several alphabetical buttons.
| Action | Key | Description |
| Add Quantity | q | Users can add product quantity by clicking on "q". |
| Add Discount | d | Users can add discounts by clicking on "d". |
| Add Price | p | Users can add price by clicking on "p". |
| Add Gobal Discount | Ctrl + Alt + D | Users can add gobal discount by clicking on "Ctrl + Alt + D". |
| See all Customer | c | User can check all the customers by clicking on "c". |
Order line
User can edit the order line as well change selection of order lines.
| Action | Key | Description |
| Selection of Order line Change | Up-arrow and down-arrow | Users can change the selection of order line by clicking on to up-arrow and down-arrow. |
| Delete the last change | Backspace | Users can delete the selected operation (i.e qty, disc, price) from the action pad of selected order. |
Payment Screen
Inside Search mode, user can search products and add to the pos order line.
| Action | Key | Description |
| Set Customer | c | Users can set customers by clicking on "c". |
| Change payment line | Up-arrow and down-arrow | Users can change the selection payment line by clicking on up-arrow and down-arrow. |
| Delete the selected payment line | r | Users can delete the payment line by clicking on "r". |
| Back to product screen | Esc | Users can go back to product screen by clicking on "Esc". |
Receipt Screen
In Receipt screen user can make changes like, receipt print and confirm it.
| Action | Key | Description |
| Confirm the order | Enter | Users can confirm the order receipt by clicking on "enter". |
| Print receipt | p | Users can add print receipt by clicking on "p". |
Customers Screen
In Customers screen user can make do several things like, add customer, select customer, search customers and many others.
| Action | Key | Description |
| Add Customer | a | Users can add customers by clicking on "a". |
| Search | f | Users can search product by clicking on "f". |
| Regular mode | Esc | Users can get back to regular pos mode from search mode by using the "Esc" button. |
| Edit the customer | e | Users can edit the selected customer by clicking on "e". |
| Validate the customers | Enter | Users can save the customer by clicking on "Enter". |
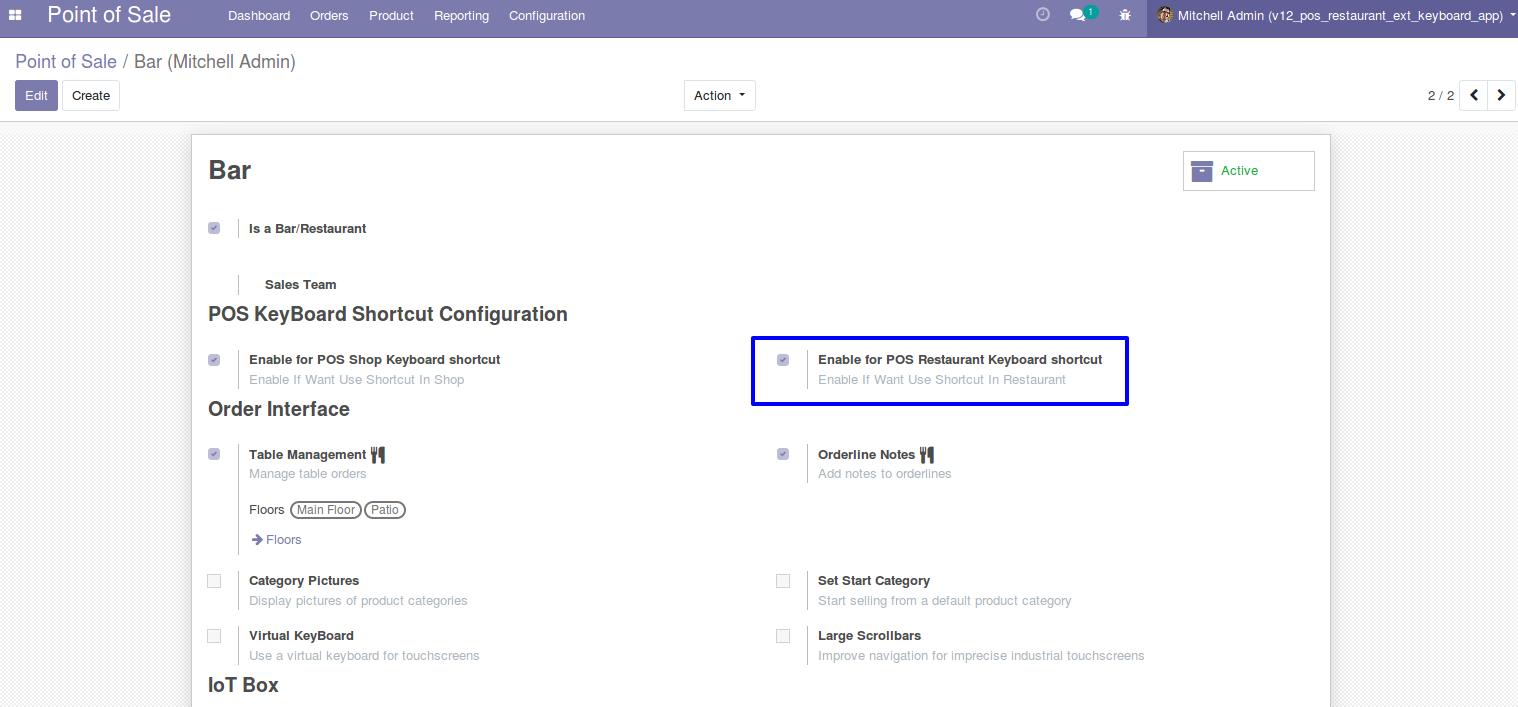
Configuration for restaurant
User can allow restaurant users to use keyboard shortcuts for POS.
Action Pad for restaurant
Inside action mode of restaurant, user can split bills, transfer bills and add guest.
| Action | Key | Description |
| Add Notes | n | User can add notes to the restaurant order, by clicking on "n" |
| Add Guest | g | User can add notes to the restaurant order,by clicking on "g" |
| Transfer Table | t | User can transfer table of restaurant, by clicking on "t" |
| Print bill | b | User can print bill of restaurant, by clicking on "b" |
| Split bill | s | User can split bill of restaurant, by clicking on "s" |
Bill Screen
Inside Bill Screen, user can print bills and change screen.
| Action | Key | Description |
| Print Bill | p | Users can add print bill by clicking on "p". |
| Back to Regular | Esc | User can return to the restaurant screen by using the "Esc" button. |
| Back to next screen | Enter | User can return to the next screen by using the "Enter" button. |
Bill Splitting Screen
Inside Bill Splitting Screen, user can change screen to payment screen
| Action | Key | Description |
| Go to payment screen | p | User can go to the payment screen by using the "p" button. |
Payment Screen
Inside Payment Screen, user can delete selected line, print invoice and many more.
| Action | Key | Description |
| Delete the selected payment line | r | User can delete the payment line by using the "r" button. |
| Give Tips | t | User can give tips by using the "t" button. |
| Print invoice | Ctrl + I | User can print invoice by using the "ctrl + I" button. |
| Validate Order | Enter | User can validate order by using the "Enter" button. |
| Back to previous screen | Esc | User can go back to previous screen by using the "Esc" button. |
Receipt Screen
Inside receipt Screen, user can print receipt and validate order.
| Action | Key | Description |
| Print Reciept | p | User can print reciept by using the "p" button. |
| Validate Order | Enter | User can validate order by using the "Enter" button. |
Client Screen
Inside Client Screen, user can search client, select client and many more.
| Action | Key | Description |
| Search Client | f | User can search client by using the "f" button. |
| Back to normal mode | Esc | User can go back to previous screen by using the "Esc" button. |
| Add new customer | a | User can add new customer by using "a" button. |
| Edit selected client | e | User can edit selected client by using the "e" button. |
| Save edited client | Enter | User can save edited client by using the "Enter" button. |
| Go to previous screen | Esc | User can go back to previous screen by using the "Esc" button. |
Our Services


Get In Touch
You will get 60 Days free support in case any bugs or issue.
For any query or support contact us without hesitation on
edgetechnologies.odoo@gmail.comThis software and associated files (the "Software") may only be used (executed, modified, executed after modifications) if you have purchased a valid license from the authors, typically via Odoo Apps, or if you have received a written agreement from the authors of the Software (see the COPYRIGHT file).
You may develop Odoo modules that use the Software as a library (typically by depending on it, importing it and using its resources), but without copying any source code or material from the Software. You may distribute those modules under the license of your choice, provided that this license is compatible with the terms of the Odoo Proprietary License (For example: LGPL, MIT, or proprietary licenses similar to this one).
It is forbidden to publish, distribute, sublicense, or sell copies of the Software or modified copies of the Software.
The above copyright notice and this permission notice must be included in all copies or substantial portions of the Software.
THE SOFTWARE IS PROVIDED "AS IS", WITHOUT WARRANTY OF ANY KIND, EXPRESS OR IMPLIED, INCLUDING BUT NOT LIMITED TO THE WARRANTIES OF MERCHANTABILITY, FITNESS FOR A PARTICULAR PURPOSE AND NONINFRINGEMENT. IN NO EVENT SHALL THE AUTHORS OR COPYRIGHT HOLDERS BE LIABLE FOR ANY CLAIM, DAMAGES OR OTHER LIABILITY, WHETHER IN AN ACTION OF CONTRACT, TORT OR OTHERWISE, ARISING FROM, OUT OF OR IN CONNECTION WITH THE SOFTWARE OR THE USE OR OTHER DEALINGS IN THE SOFTWARE.